4Runner Maintenance Update - Cooling System & Front Brakes
April 20, 2023

Upon purchasing the 4Runner about a month ago, I found that I had 3 key issues that essentially prevented me from driving it. Those issues were:
- Temperature creeping up at idle when sitting for more than 3-5 minutes
- Coolant leak directly underneath radiator
- Brakes so shaky that it can only be compared to riding my jet ski during a busy day at the lake
Neither of those issues are terrible, however the 2UZ-FE is somewhat notorious for blowing head gaskets if overheated (even once). With that knowledge, I decided to essentially keep the car parked and limit my use to avoid causing any kind of catastrophic failure. I did some inspections on the car to identify what the two failure points were. Here's what I found:
- Overheating issue at idle can be caused by a bad fan clutch in the 2UZ-FE. To test the fan clutch, I followed the below video (no it's not a V8, but the Tacoma is very similar in a lot of ways and figured this should be pretty accurate). My findings (especially when applying pressure to it with a folded newspaper) were that it was toast and applying very little airflow to the motor
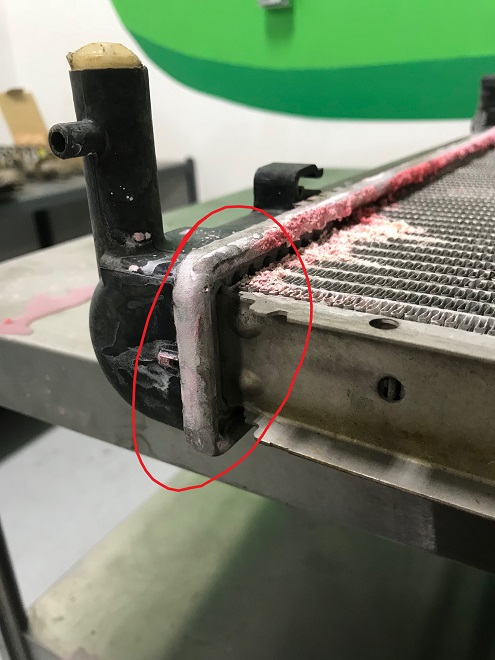
- Finding the coolant leak was super easy as my GX470 actually suffered a similar leak. These radiators are constructed of hard plastic and metal. The failure point is actually where the two meet and on mine the failure was at the bottom as shown in the image below
- Rotors warp and this happens. Bought new front brakes; no real inspection needed
Here's what I bought from Toyota (with exception to the brakes):
- Fan Clutch - 16210-50102
- Radiator - 16410-AZ043
- Front Brakes (pads and rotors) - PowerStop KOE137
- Coolant - 00272-SLLC2
- Thermostat - 90916-03100
Once I actually got to the maintenance (which I had already done on the GX470), this became a 3-4 hour job and is actually very easy. I'll also point out that doing this work on my LX570 was very similar to this, but the LX is just beefier in every way. Here's how I did the job:
- Remove the coolant expansion tank. It's 3 10mm bolts on the back of the fan shroud. Remove the hose going from the expansion tank to the radiator and just set it aside
- Remove the fan clutch. This job sucks and will destroy your knuckles. The job consists of 4 12mm nuts and requires you to move the fan around to access each one. The video below provides a good reference for doing the job
- As a general note, DO NOT STRIP THESE NUTS! If you do not have a 6-point 12mm wrench, do not attempt this as a 12+ point will strip these and lead you to a nightmare scenario that you do not want to play with!
- Release the fan shroud by removing the two 10mm bolts at the top of the shroud, releasing the oil cooler lines towards the bottom of the shroud (just 2 clips), and pulling up (it's just held in by two clips at the bottom). When pulling up, make sure to pull both the fan and the shroud up at the same time
- To prepare the radiator for removal, start by unhooking the each of the lines going in. In total, I believe that there are 4 lines to disconnect (2 oil cooler lines and the upper/lower radiator hoses). All of these lines can be easily removed with vice grips or pliers (personally, I like vice grips)
- Once the lines are removed, there are 4 bolts (one at each corner) that need to be removed. The best order to do it is removing the two bottom ones and then the two top ones (access to the top is way easier). After those are out, just pull up and the radiator is done. Honestly, the radiator in the 4Runner is one of the easier jobs that I've had to tackle on a car. Here's a good video on the how-to do it
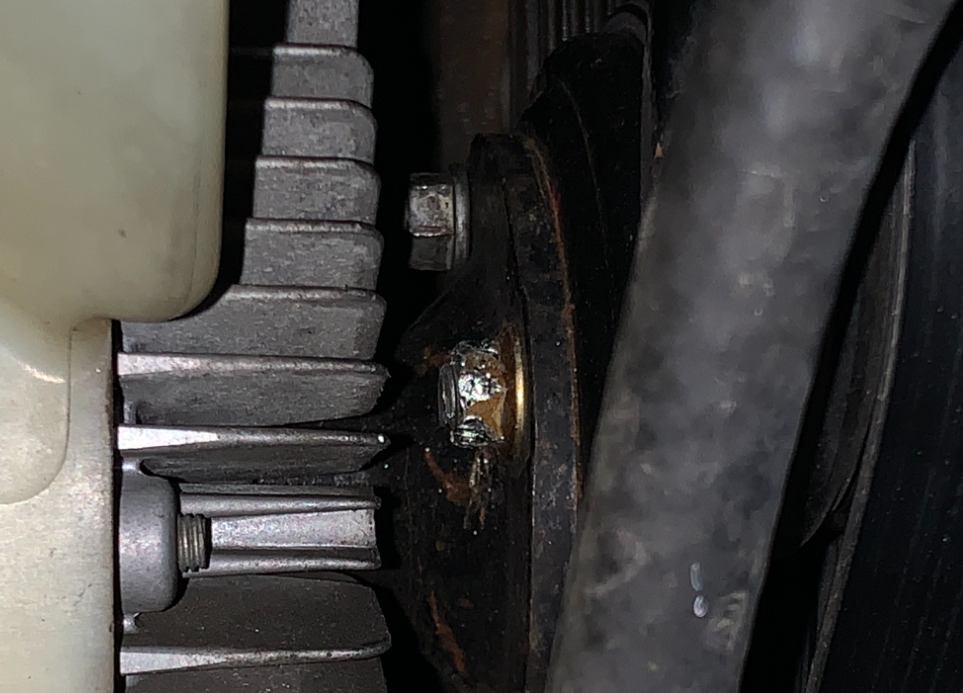
- To replace the thermostat, it's just 3 12mm nuts holding on the housing toward the top of the engine. I was able to get it with a ratchet wrench (so nice compared to the rest of this work). The only note for replacing is to make sure that the orientation is right; the air release MUST be facing up (like the image below)
- Do your due diligence while you're here. Check your serpentine belt, pulleys, water pump for leaks, alternator, and any other potential maintenance items because your access to everything is much better now than it is with the radiator, shroud, and fan in the car. Fortunately I did not have anything additionally wrong, but make sure to check
- Reassembly is truly as easy as disassembly. Radiator first, then shroud/fan, connect the hoses, and you're done outside of adding coolant
- For coolant, just follow this video at about 16 minutes through to the end. Burping it takes about 10 minutes and is super easy, just make sure to use OEM coolant (pink stuff) and don't ever mix colors


My last item is pertaining to brakes, but I will not be posting a how-to on that (there are too many good options out there that explain and show better than I can). This is the how-to video on replacing the brake pads and rotors:
In all, the 4Runner is now back up and going. This weekend it will be on its first towing adventure with a 1967 VW bus on a car hauler, so glad I was able to get the cooling system resolved.


Comments
Post a Comment